Quite pleased with my Christmas Village centrepiece. Two-tier chocolate mud and bitter orange cake with 1kg dark chocolate ganache and 1kg white chocolate ganache. Yes, truly a death-by-chocolate experience!
Friday, December 27, 2013
Edible Zentangle Christmas Trees - how to
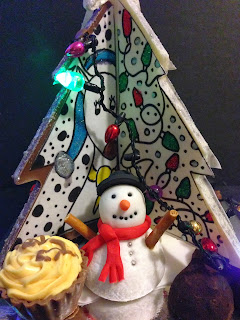
I combined my love for doodling and the need to use up a stash of chocolate into my Christmas gifts this year and this is the result - a zentangle christmas tree!
Start with a silicon chocolate mould. I used this chocolate mould by D'Line.
What happened next was an extremely steep learning curve (and a slap-in-the-face reality check!) on tempering chocolate. Tried various methods, made a big mess and still ended up with bloom - those white patches that make your chocolate look mouldy but they're harmless, just ugly to look at. My cake friend pastry chef Courtney finally showed me the easiest way to temper chocolate and it worked a charm... yay!
Subsequently my lazy self took over and I got trusty Bimbi to do the tempering, and she did it with great ease and fabulous results. In retrospect, I should've gotten 4 of those tree moulds because tempering just a little bit of chocolate at a time is not the most efficient use of Bimbi nor my time.... (sigh).... live and learn.
Assemble the tree...
Make doodles. I started with zentangles which promptly turned into just doodles. I freehand drew the outline on a sheet of edible sugar paper (I used Kopykake) using an Americolor pen with edible black ink. I then painted splashes of colour with Americolor airbrush paint and added some Rainbow Dust glitter for that Christmassy feel.I cut out and stuck the edible sugar paper on the tree, and decorated the tree with chocolate truffles and snowmen and a string of fairy lights (Christmas is not complete without fairy lights!).
Make a bunch of them and you get a forest!
Or make a Christmas scene.
SO pretty in the dark!Sunday, December 15, 2013
Friday, December 13, 2013
Marshmallow snowmen how-to
These are my favourite marshmallows coz they make fabulous snowmen.
You'll need a white marshmallow, half a toothpick (use a cutter to prevent splintering) and a ball of white fondant. And here're some step-by-step pics on how to put one together.
As the fondant head is heavier than the marshmallow body, the head will tilt to one side. Don't try to correct this because it'll give the snowman an interesting pose.
Stick pretzels to the sides for arms. I forgot to buy pretzels for this fella, but these ones have pretzel arms....
Notice how they also have much smaller heads in proportion to the marshmallows and the size of the heads gave them a very different look. So don't be afraid to play around with different proportions.
Saturday, November 16, 2013
2013 Recap
2013 has been a busy year. My caking activities took a new turn this year and I discovered my love for bobblehead cake toppers. To my utter delight and amazement, it turns out I'm not the only one loving those bobbleheads. As a result, it's been a steady stream of orders through the year and almost every weekend has been a bobblehead weekend, hence why I've neglected my blog.
In addition to bobbleheads, I also discovered a fitting name for my little hobby-turned-small-business, Cakicature, which is a play of words combining "cake" and "caricature." I set up a Cakicature Facebook page and a website as well. Do click on the links and check them out.
To all those people who have been a great source of support to me this year, I'd like to say a big Thank You. My hubby Greg for being so patient, my fellow cake decorating friends on Facebook, whom I fondly refer to as "my cakey friends" - an uber thank you.... yes, you know who you are! Thanks for all the invaluable support, advice and awesome tips. And of course, to all my customers, thank you muchly for giving me the opportunities to make such a variety of bobbleheads and cake toppers. They each have their own unique challenges and I've learned so much more from them.
Finally, I'd like to thank the master cake artists whom I've been fortunate enough to meet and learn from by attending their workshops - Peggy Tucker and Dawn from Dinkydoodle. The skills I learned from you have greatly expanded my capabilities. Oh, and all those Craftsy video lessons have been truly priceless as well.
I still have one more person to thank, and that's Gary from Oldvision for his "how to pack fragile items" youtube. If not for this youtube video, I wouldn't have a clue how to pack and ship my bobbleheads safely. Check out his video here: http://www.youtube.com/watch?v=M4X-8a2YVtw
That's my oscar-wannabe-speech done. Hahaha! Here're a few pickies from 2013. First, the bobbleheads....
And I made some cakes too...
Labels:
3D,
baking,
birthday,
bobblehead,
cake,
cake decorating,
cake topper,
caricature,
chocolate,
cupcakes,
figurine,
fondant,
ganache,
gumpaste,
jockey,
novelty,
sugar
Subscribe to:
Comments (Atom)


