Quite pleased with my Christmas Village centrepiece. Two-tier chocolate mud and bitter orange cake with 1kg dark chocolate ganache and 1kg white chocolate ganache. Yes, truly a death-by-chocolate experience!
Friday, December 27, 2013
Edible Zentangle Christmas Trees - how to
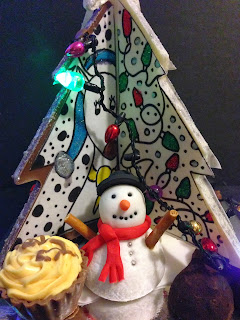
I combined my love for doodling and the need to use up a stash of chocolate into my Christmas gifts this year and this is the result - a zentangle christmas tree!
Start with a silicon chocolate mould. I used this chocolate mould by D'Line.
What happened next was an extremely steep learning curve (and a slap-in-the-face reality check!) on tempering chocolate. Tried various methods, made a big mess and still ended up with bloom - those white patches that make your chocolate look mouldy but they're harmless, just ugly to look at. My cake friend pastry chef Courtney finally showed me the easiest way to temper chocolate and it worked a charm... yay!
Subsequently my lazy self took over and I got trusty Bimbi to do the tempering, and she did it with great ease and fabulous results. In retrospect, I should've gotten 4 of those tree moulds because tempering just a little bit of chocolate at a time is not the most efficient use of Bimbi nor my time.... (sigh).... live and learn.
Assemble the tree...
Make doodles. I started with zentangles which promptly turned into just doodles. I freehand drew the outline on a sheet of edible sugar paper (I used Kopykake) using an Americolor pen with edible black ink. I then painted splashes of colour with Americolor airbrush paint and added some Rainbow Dust glitter for that Christmassy feel.I cut out and stuck the edible sugar paper on the tree, and decorated the tree with chocolate truffles and snowmen and a string of fairy lights (Christmas is not complete without fairy lights!).
Make a bunch of them and you get a forest!
Or make a Christmas scene.
SO pretty in the dark!Sunday, December 15, 2013
Friday, December 13, 2013
Marshmallow snowmen how-to
These are my favourite marshmallows coz they make fabulous snowmen.
You'll need a white marshmallow, half a toothpick (use a cutter to prevent splintering) and a ball of white fondant. And here're some step-by-step pics on how to put one together.
As the fondant head is heavier than the marshmallow body, the head will tilt to one side. Don't try to correct this because it'll give the snowman an interesting pose.
Stick pretzels to the sides for arms. I forgot to buy pretzels for this fella, but these ones have pretzel arms....
Notice how they also have much smaller heads in proportion to the marshmallows and the size of the heads gave them a very different look. So don't be afraid to play around with different proportions.
Subscribe to:
Comments (Atom)


