Showing posts with label how to. Show all posts

Friday, December 27, 2013

Edible Zentangle Christmas Trees - how to

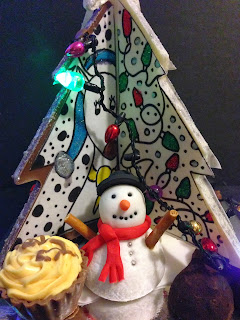
I combined my love for doodling and the need to use up a stash of chocolate into my Christmas gifts this year and this is the result - a zentangle christmas tree!
Start with a silicon chocolate mould. I used this chocolate mould by D'Line.
What happened next was an extremely steep learning curve (and a slap-in-the-face reality check!) on tempering chocolate. Tried various methods, made a big mess and still ended up with bloom - those white patches that make your chocolate look mouldy but they're harmless, just ugly to look at. My cake friend pastry chef Courtney finally showed me the easiest way to temper chocolate and it worked a charm... yay! 

Subsequently my lazy self took over and I got trusty Bimbi to do the tempering, and she did it with great ease and fabulous results. In retrospect, I should've gotten 4 of those tree moulds because tempering just a little bit of chocolate at a time is not the most efficient use of Bimbi nor my time.... (sigh).... live and learn.
Assemble the tree...
Make doodles. I started with zentangles which promptly turned into just doodles. I freehand drew the outline on a sheet of edible sugar paper (I used Kopykake) using an Americolor pen with edible black ink. I then painted splashes of colour with Americolor airbrush paint and added some Rainbow Dust glitter for that Christmassy feel.
I cut out and stuck the edible sugar paper on the tree, and decorated the tree with chocolate truffles and snowmen and a string of fairy lights (Christmas is not complete without fairy lights!).
Make a bunch of them and you get a forest!
Or make a Christmas scene.
SO pretty in the dark!


Wednesday, September 19, 2012

Uncle Bill's racing cake

A 90th birthday cake for Jo's uncle who likes horse racing. 
I make LCM shapes for the horses - head, body and legs.
Cover the shapes with fondant.
Assemble the body and leave it to harden overnight. My trusty silicone petit four mould to the rescue, as usual.
Next day I attach the heads and use paper towels to hold them in place. I then leave these for a few days to dry out and harden properly. This is necessary to ensure that the legs would support the weight of the body and head.
Add details. I pipe the hair and tail using a Makins clay extruder - used only for fondant. If you have a clay extruder that you've used for clay or polymer clay, you need to get a new one. I never mix food tools with non-food tools. The same goes for brushes and other equipment.
Don't forget to make 2 holes for the nostrils.
For the ears, start with 2 small teardrops.
Make a line indent on each teardrop.
Attach the ears.
I cut a cardboard cake board into a rectangular shape and cover with green fondant. I make railings out of toothpicks covered in white fondant.
Fine details are added - jockey complete with boots and caps and a fallen jockey adds to the drama.
Final cake is quite different from what I've originally planned! I initially thought of a rectangular cake iced with buttercream (Jo wanted the most simple flavours) and covered with green tinted desiccated coconut, topped with the horses and race track. But when I completed the topper, I realised I didn't have a cake box large enough for a rectangular cake. So, the cake design was converted from rectangular to round. Can't take credit for the design, though coz I found heaps of cakes like this on google. BUT, I can take credit for the fallen jockey idea! LOL.


Monday, August 6, 2012

How to run your own sweat shop

It's my day off today so I made another 60 puppies, bringing my weekend total to more than 200 fondant puppies. That has got to be a record! Feels like a sweat shop. So, if you feel like running your own sweat shop and make fondant puppies by the masses, follow my instructions...
To fit out my sweat shop, I invested in a sculpting knife, a ball tool, a carving tool, brush, sugar flower glue, silicon chocolate mould, and of course, fondant.
Oh, and don't forget, some black non-pareils...
Step 1: Start with an upturned silicon chocolate mould. As the mould is floppy, I rest it on a plastic lid.
Step 2: Make a whole bunch of puppy arms (refer to my earlier blog on the basics) and perch them on the mould to shape the arms so that when you place them on your cupcakes, the puppies will look like they're hugging the tops of the cakes. I make 24 at a time because that's how many my silicon mould holds.
Step 2: Make 24 oval shaped heads. I'm making a bunch of St Bernard puppies, so I use Bakels chocolate fondant to get a dark brown colour for the heads.
Step 3: Add a small strip of white fondant on each head.
Step 4: Make 24 pairs of ears using the same chocolate fondant.
Step 5: Attach a white fondant muzzle to each puppy head, like this.
Step 6: Make 2 holes on each head for the eyes.
Step 7: Attach the heads to the arms.
Step 8: Attach the ears.
Step 9: Add noses and eyes (this is where the black non-pareils come in handy).
Step 10: And you've finished 24 St Bernard fondant puppies. Much quicker than making each individually.
Some Bull Terriers...

Sunday, July 22, 2012

Hello Pita and Binboy!

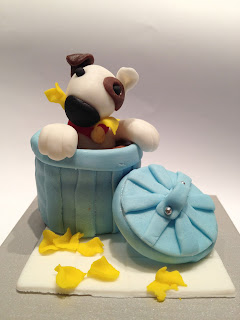
Yes, I think I've gone quite mad. I've assigned names to my sugar puppies! Meet Pita the Purple Pitbull and Binboy the rubbish-loving Bull Terrier. Haha. I made these as showcase pieces to promote cupcakes for the RSPCA Cupcake Day fundraising. Binboy and Pita are strong advocates against BSL (breed specific legislation). Till now, the scariest things they've ever done are raiding the rubbish bin and grocery bag. Watch this space, I think. There'll be more "Adventures of Pita and Binboy."
As always, I get carried away and forget to take any progress pics of Binboy, but here're some pics of Pita. Start with a bar of Kellogg's LCM breakfast bar. Make sure it's the original plain one.
Cut the LCM bar in half and stack them. Roll out some green fondant and wrap the LCM to resemble a green grocery bag. Make it flop and crinkle like fabric to add realism. I also added piping on the sides and attached that little hoop that supermarket checkout chicks use to hang the bag at the checkout. Yes, I'm anal retentive! Various angles of the bag...

 Roll out some brown fondant to cover the exposed LCM.
Add Pita the Pitbull and some carrots.
Add more details - green stems on the carrots.
Add a pineapple coz who goes grocery shopping just to buy a bagful of carrots... hmmm... actually, I DO know someone who once bought 10 kilos of carrots but that's another blog!
Two carrots outside the bag adds to the realism.
Don't forget bag handles!
Here's Pita's buddy, Binboy...

Don't you agree they look good enough NOT to eat!


Bloggers.com

Bloggers - Meet Millions of Bloggers