Showing posts with label sculpture. Show all posts

Monday, June 9, 2014

Bow chicka wow wow wow.....

Stripper pole dancer cake topper for an 18th birthday cake.

Eek! It's Jack Skellington!

I made this Jack Skellington cake topper. He's quite special because he was commissioned by a customer from Canberra. My first Canberra customer! I didn't have to worry about packing and shipping, which was kinda nice. Been making and shipping figurines for more than a year now and finally got a Canberra order. 
And here's Jack happily perched on the cake made by my customer. She did a most awesome job, don't you agree?

Saturday, September 28, 2013

Catching up!

I haven't posted in a while. Been a busy year. Don't know where to begin so I'll start with my latest bobblehead - here's Slash made for Noah's personal groomer's birthday.


Saturday, January 5, 2013

Mr Bean

Mr Bean step by step...
My first attempt at sculpting a caricature. I chose Mr Bean coz he's one of my favourite characters and his face is full of expression. 

Step 1: Usual stuff, start with an egg-shaped ball of LCM, or RKT (rice krispie treats). I used half a bar of LCM coz I only needed a little. No point making a whole batch of RKT just for a little bit. Squish and shape LCM into an egg. Oh, do you like my new head moulding tool? 
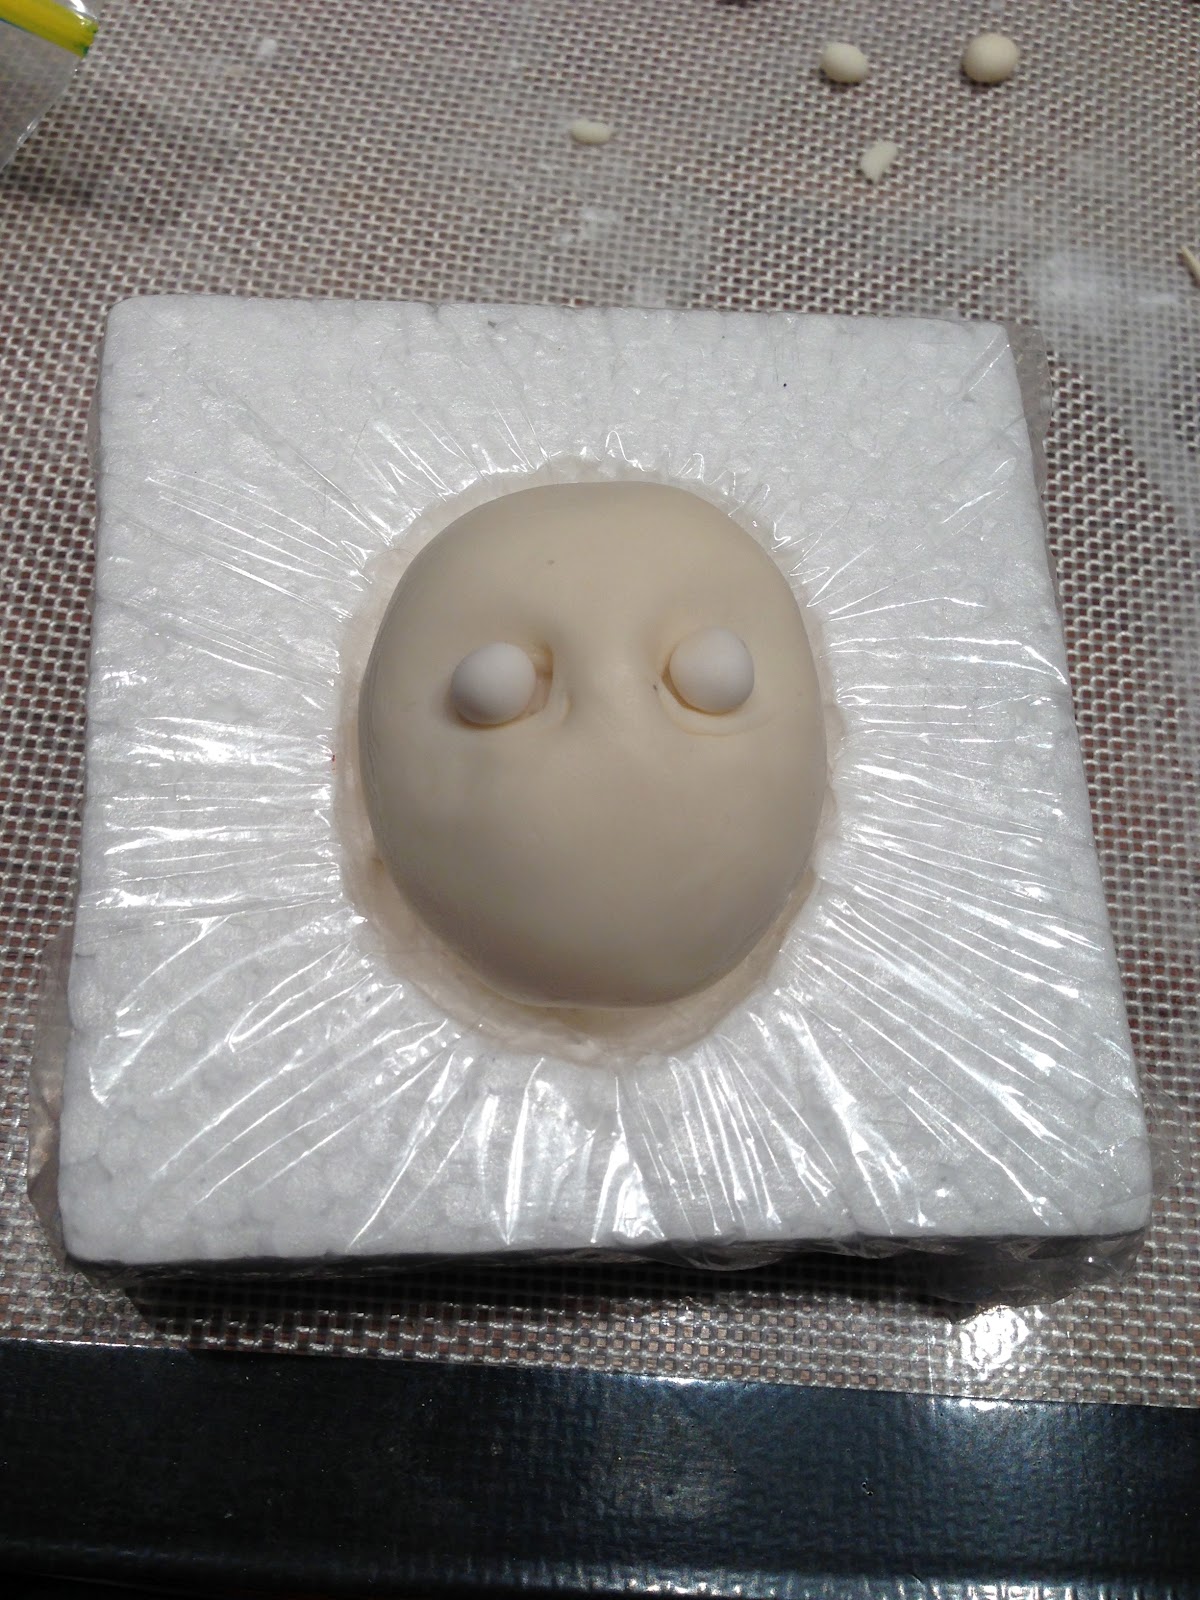
Step 2: Cover LCM egg with fondant. For face sculpting, I find a mix of 50-50 white modelling chocolate and Satin Ice ivory fondant gives me the best texture. The modelling chocolate prolongs the working time of the fondant without drying out too quickly and the fondant prevents the modelling chocolate from getting too greasy from the heat of my fingers. All in all, a great marriage :-) Don't forget to indent two holes for the eye sockets.
Step 3: Make 2 small balls from white fondant for the eye balls. Make sure the eye balls fit in the eye sockets. Before proceeding to Step Four, leave the face and eye balls to dry out and firm up a little. This is a good time to catch up on some housework... or watch TV.... or have a nana nap (I chose the second and third option. Hehehe).
Step 4: Add eye lids. I ended up doubling the size of the eye balls to add a bit of drama and expression to Mr Bean's face.
Step 5: Form a nose and attach to the face with some tylose glue. 
Step 6: Add the cheeks.
Step 7: Blend the cheeks into the face. This is another reason why I add white modelling chocolate to fondant. It's easier to blend and smooth out the seams. Don't forget to etch out the mouth at this stage.
Step 8: Add lips and forehead. At this point I also etched out some details such as wrinkles and skin folds.
Step 9: Add pupils to the eyes. I simply used black non-pareils.
Step 10: Add eyebrows. Remember eyebrows play an integral part in facial expressions so give some thought about how to shape the eyebrows to get that expression you want to achieve. Don't forget to attach the ears!
Step 11: Finally, the hair and here's Mr Bean! A few things I'd like to have done better; make the forehead wider and higher, for example. And make better looking hair. But overall, quite happy with my first attempt. This head is rather large, almost the size of an egg. Next project is to make a smaller head which is more of a challenge to get all the details on a smaller scale. 
Bean! With a dash of colour...

Tuesday, November 6, 2012

Purple pig

This is my other weekend rush job. Got the cake order late Friday night, from Greg.... gotta love my hubby! This is the smallest 3D novelty I've made, it'll only feed like 4 people. LOL. This is coz Greg's taking it to Sydney on the red eyed special first up Monday. Can't even imagine him trying to balance a 3 or 4 tiered topsy turvy in the plane! Hahaha. So, the cake's gotta be small enough to fit in a shopping bag as hand luggage.
First thing's first... prepare foam core cake board. I secured bubble straws in the foam core and slip some fondant discs (slipped discs???) around the straws - these will be the pig's legs.
Greg carved the pig's belly from styrofoam, and there's the model pig in the background. It's a Smart Salary piggy bank... sorta like a corporate mascot I suppose. Purple not quite the right shade but since this is a rush job, I don't have time to play around with colours so I used Satin Ice purple fondant straight from the tub. As it turned out, the model piggy bank is the wrong shade of purple while my cake is very close to the official corporate purple... Yes, the marketing people at Smart Salary actually whipped out their colour charts and compared my pig.... awww......I'm touched!
My trusted Planet Cake white chocolate mud cake layered and covered in dark chocolate ganache.
Oink oink...
 Oink...
 The end!


Tuesday, October 30, 2012

Most epic one yet!

This is my most epic cake yet.... a standing bear cake. I'm really chuffed with how it turned out. It's a commissioned piece from my friend Alex for her sister's birthday. Her sister apparently likes Pedo Bear, which is rather inappropriate, I know... but clients do come with the weirdest requests! LOL. Although, Alex's original idea was to just bake a round glutten free dairy free chocolate cake and stick an edible image of Pedo on the cake. I talked her into this! Yes, I'm a sucker for punishment!
Start with watching an inspirational video by Bronwen Weber... do a search on You Tube. Bronwen's "cake bones" are available online but at $100, I decided to make my own... with a bit of help from Greg and Mr Bunnings, a nickname concocted by my buddies from the Facebook Australian Cake Decorating Network. When Greg and I were shopping for PVC bits at Bunnings, this very helpful staff member kept offering his help.... well, we stood looking at and pondering about pipes and bits for over an hour so I guess he realised we were kinda struggling. At his 3rd offer to help, I decided to explain what I planned to make. He scratched his head. I showed him a picture of Pedo Bear and he took off like a rocket.... hmmm.... I suppose that's the sort of effect Pedo Bear has on people.
From the bits and pieces, Greg made this cake skeleton...
Alex got her sister to bake her own birthday cake (smoooooth, Alex!)... It's gluten free, so a bit of a challenge to tort... oops!
Leaning tower of gluten free with cascading waterfall of ganache...
The best thing about chocolate cake is, you can sorta squish fallen bits back into the cake and glue them with ganache... like so...
Slap on a thick layer of ganache and no one's the wiser...
Meanwhile, Greg's prepping the cake board.
He even covered it with cake foil.... awww... looks like store bought!
So professional, it deserves a second look.
Assemble the skeleton, cover with foil. Oh, make sure you wash your bones thoroughly... we put ours through the dishwasher about 3 times.... afterall, they did come from the plumbing section in Bunnings!
Attach the cake board and secure it to the "hip bone"
Homemade LCMs, aka rice krispie treats, aka RKT. For this cake, I used up a giant box of rice bubbles, 3 bags of marshmallows and half a block of butter.... that's how much rice treats is needed to "flesh" out the bones.
One leg before and one leg after. The ganache helps the rice treats to stick to the bones.
Close-up of leg - doesn't that look like a bloody bone with ripped off flesh? Bu-wahahaha!
Greg's very good at packing in the rice treat flesh.
Legs done!
Under-belly done too, cling-wrap to hold everything in place and leave to set.
Once set, attach the spine and slide the cake down the spine, attach the shoulders and foil wrap.
Ganache the shoulders.
Rice treats wrapped around the shoulders and chest.
Plop on the head, which is a styrofoam ball. I used styro coz it's light and will stop the cake being too top heavy.
Okay.... the torso's looking elongated.... oops! Time to perform some surgery. Dislocate the shoulders, then saw off a chunk of the spine... easy... easy.....
Much better. Bear all ganached... well, almost... looks like skin, eh? LOL.
Close up of ganache after Greg and I have slapped it on...
Close up of ganache after smoothing. Best way to smooth ganache on a novelty cake is, wait for the initial slap-on layers to set and harden. Put on a pair of food-grade gloves, get ready a bowl of hot water. Dip fingers in hot water and use fingers to smooth.
Time for the fun stuff. Yet another good thing I stole from Greg (hehe)... his marble rolling pin. Nice and heavy, best ever to roll out fondant.
Stick on fondant one panel at a time.
Almost there...
Done! Sorry... as usual, I get carried away and forget to take pics but you get the picture. It's just the final touches. Pedo Bear says "you're too old for me" which is a good thing!


Bloggers.com

Bloggers - Meet Millions of Bloggers