Wednesday, January 16, 2013

Skateboarder

This is how I made a skateboarder from modelling chocolate and fondant.
Start bottom up. Make shoes and socks. Skewer through one shoe and build up the legs. I inserted a toothpick in the other leg just to keep it straight. I used a mix of 50-50 modelling chocolate and fondant. This takes advantage of both worlds - the workability and springiness of fondant and the strength of modelling chocolate. Usually with just fondant, I'll have to leave this to dry at least overnight if not a few days. 
But with modelling chocolate in the mix, I can keep working and build up the pants as well. Would you believe it, this is standing on its own, no propping up. Can't do that with pure fondant. And... no cracking, no elephant skin wrinkling. Gotta be happy with that!
Oh, this is how I made the pants... one leg at a time. Shape a sausage, insert a skewer and roll the skewer around to hollow out the sausage and make a pant leg. Make 2 of these and stick them together to form a pair.
I kept going, no need for drying time, added the t-shirt and neck. Just about complete at this stage. The Mambo name and logo are hand-drawn on white fondant and stuck on the t-shirt.
Next, sleeves were attached. I then made the arms and hands, left l for about 1 minute and attached to the sleeves, again no need to prop up. They basically stayed where I intended them to. Attach head and he's ready to partay!


Saturday, January 5, 2013

Mr Bean

Mr Bean step by step...
My first attempt at sculpting a caricature. I chose Mr Bean coz he's one of my favourite characters and his face is full of expression. 

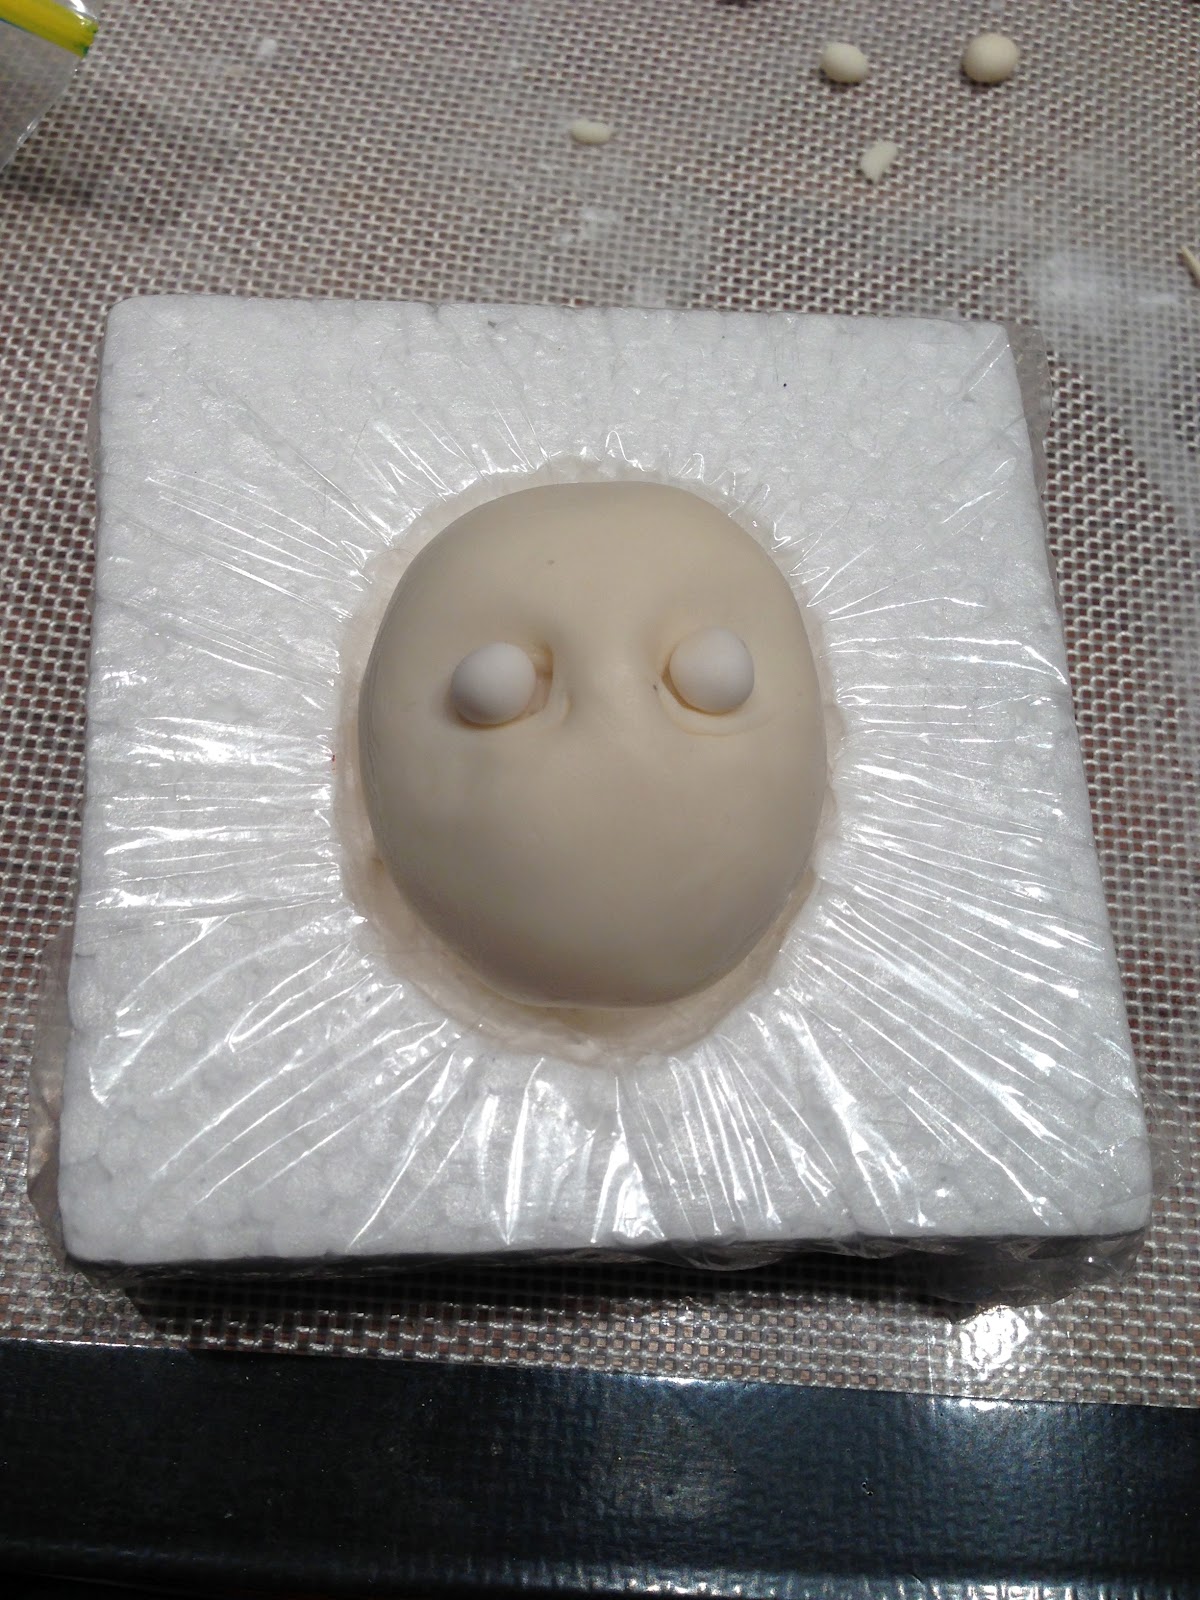
Step 1: Usual stuff, start with an egg-shaped ball of LCM, or RKT (rice krispie treats). I used half a bar of LCM coz I only needed a little. No point making a whole batch of RKT just for a little bit. Squish and shape LCM into an egg. Oh, do you like my new head moulding tool? 
Step 2: Cover LCM egg with fondant. For face sculpting, I find a mix of 50-50 white modelling chocolate and Satin Ice ivory fondant gives me the best texture. The modelling chocolate prolongs the working time of the fondant without drying out too quickly and the fondant prevents the modelling chocolate from getting too greasy from the heat of my fingers. All in all, a great marriage :-) Don't forget to indent two holes for the eye sockets.
Step 3: Make 2 small balls from white fondant for the eye balls. Make sure the eye balls fit in the eye sockets. Before proceeding to Step Four, leave the face and eye balls to dry out and firm up a little. This is a good time to catch up on some housework... or watch TV.... or have a nana nap (I chose the second and third option. Hehehe).
Step 4: Add eye lids. I ended up doubling the size of the eye balls to add a bit of drama and expression to Mr Bean's face.
Step 5: Form a nose and attach to the face with some tylose glue. 
Step 6: Add the cheeks.
Step 7: Blend the cheeks into the face. This is another reason why I add white modelling chocolate to fondant. It's easier to blend and smooth out the seams. Don't forget to etch out the mouth at this stage.
Step 8: Add lips and forehead. At this point I also etched out some details such as wrinkles and skin folds.
Step 9: Add pupils to the eyes. I simply used black non-pareils.
Step 10: Add eyebrows. Remember eyebrows play an integral part in facial expressions so give some thought about how to shape the eyebrows to get that expression you want to achieve. Don't forget to attach the ears!
Step 11: Finally, the hair and here's Mr Bean! A few things I'd like to have done better; make the forehead wider and higher, for example. And make better looking hair. But overall, quite happy with my first attempt. This head is rather large, almost the size of an egg. Next project is to make a smaller head which is more of a challenge to get all the details on a smaller scale. 
Bean! With a dash of colour...

Wednesday, December 19, 2012

It's Christmas!

HEI HEI HEI.... MERRY CHRISTMAS... HO HO HO!

PLIGHT OF A SNOWMAN

TOO MUCH CHRISTMAS CHEER

Saturday, December 8, 2012

Missy Giraffe

Missy Giraffe is a chocolate overload cake! Her body is 14 layers of Lindt and Koko Black chocolate mud cake and milk chocolate ganache. Her head and legs are cake pops - mud cake offcuts mixed with dark chocolate ganache and formed into shape. Her muzzle and arms are rice krispie treats. Everything else is edible except for the 4 alphabet blocks which are styro blocks.
I made Missy's necklace using isomalt and Marina Sousa's bead mould.
These made-for-kiddies silicone cups are perfect for melting small amounts of isomalt in the microwave. They're great coz just wait for the isomalt to cool and harden, then just pop them out.
Aren't they pretty? Marina's bead moulds are expensive ranging from $30 upwards but well worth it.
 I also made some isomalt butterflies, here's one of them.
I prepared the cake board weeks in advance. First, I covered the board in white fondant, and left it for a few days to dry out nicely. I then made a template for airbrushing.
Airbrush the pink gingham design.
In the meantime, off to see Mr Bunnings again. PVC pipe with connectors. Also got painter's masking tape. My fellow cakie Lisa Brown suggested using masking tape for delicate surface instead of template to avoid wonky lines like what I got above.
Got hubby to attach the PVC pipe to the cake board, then wrap it up with a layer of baking paper and 3 layers of cling wrap to protect it. Oh, don't forget to run the pipe in the dishwasher and wrap with foil before attaching to the board. This is when I got carried away again. Got preoccupied shaping and cutting the support boards, so no in-between pics again.
The pipe is cut to length, attach a small cake board cut from foam board and cover everything in foil.
This forms a platform and support for Missy's head.
Shape head with cake offcuts and ganache, slice and shape RKT (rice krispie treats) for the muzzle. I attached the underside of the muzzle using ganache and held in place with cling wrap while waiting for ganache to set. While waiting, it's time to ganache the body.
 Body and head all ganached, very rough looking, wait for ganache to set.
Once hardened, smooth out with gloved hands dipped in hot water.
Cover in segments. I cut out a template from baking paper for Missy's chest and belly which will be covered in pink fondant later.
Missy all covered.
Add ears and nose.
Eyes and lids.
Close-up.
Add giraffe spots.
Add arms, legs, tail and horns.
This is the fun bit - Accessories!
Ran out of time to done all sides of the alphabet blocks so letters only on one side. Here's the isomalt butterfly and glossy lipstick.

Batty eyelashes are a must to add to the adorable factor. LOL.
Missy Giraffe all ready for a baby shower party. Message to the expectant mother? It's only a matter of time your baby girl will grow up to play with your makeup and jewellery! Hahaha.
"What's wrong mummy? Can't I play with these?"


Bloggers.com

Bloggers - Meet Millions of Bloggers