Thursday, July 26, 2012

Tractor and cats

Made this Tractor and Cats cake for afternoon tea. The cake is to celebrate the end of fieldwork (tractor in the field) and to cheer up friends at work who have been working so hard chasing for monitoring data from various policy areas. We often say "it's like herding cats" and that's what the red cats represent. I'm quite pleased with this effort coz it took me only 6 hours in total, and that includes making the white chocolate cake batter from scratch and baking it (I don't believe in pre-mixes), making the white TimTams filling, carving the cake (with a little bit of help from hubby!), icing the cake, AND making the fondant tractor and cats. Not too bad, eh?


I was a bit concerned about how the cake turned out because this is the first time I'm baking a full-sized cake as opposed to small cakes like cupcakes. I got the recipe from my Planet Cake book. It's a dense white chocolate cake suitable for carving and sculpting and it will not crumble or fall apart. The recipe says bake in 180C for 1 hour 40 minutes and I thought, "gee... that must not be right coz cupcakes take only 10 minutes." So, I was checking the cake every 10 minutes after the first hour, but Paris Cutler was totally right - the cake was done in exactly 1 hour 40 minutes! And, unlike cupcakes, there's no prior tasting... I mean, I cannot just cut a slice of the cake to try! So, it was fingers crossed and watching people's expressions as they take that first bite.... they love it! Success!

Bath time!

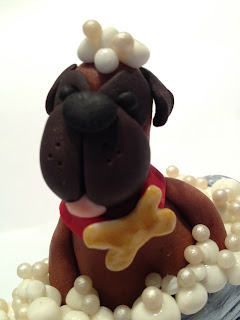
Here're my two boys having a bath - Zo and Noah. I made these as Thank You gestures to Paul Walters of Aussie Pooch Mobile coz he comes round once a month to give them and Ripley their baths. They smell and feel so good after that. Paul's been grooming and washing them since they're little babies. Ripley's now 4 years old, Zo just turned 3 and Noah's turning 4 in October. Thank you Paul!


Sunday, July 22, 2012

Hello Pita and Binboy!

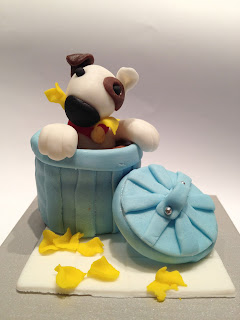
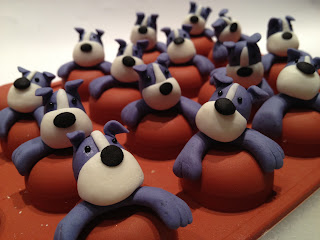
Yes, I think I've gone quite mad. I've assigned names to my sugar puppies! Meet Pita the Purple Pitbull and Binboy the rubbish-loving Bull Terrier. Haha. I made these as showcase pieces to promote cupcakes for the RSPCA Cupcake Day fundraising. Binboy and Pita are strong advocates against BSL (breed specific legislation). Till now, the scariest things they've ever done are raiding the rubbish bin and grocery bag. Watch this space, I think. There'll be more "Adventures of Pita and Binboy."
As always, I get carried away and forget to take any progress pics of Binboy, but here're some pics of Pita. Start with a bar of Kellogg's LCM breakfast bar. Make sure it's the original plain one.
Cut the LCM bar in half and stack them. Roll out some green fondant and wrap the LCM to resemble a green grocery bag. Make it flop and crinkle like fabric to add realism. I also added piping on the sides and attached that little hoop that supermarket checkout chicks use to hang the bag at the checkout. Yes, I'm anal retentive! Various angles of the bag...

 Roll out some brown fondant to cover the exposed LCM.
Add Pita the Pitbull and some carrots.
Add more details - green stems on the carrots.
Add a pineapple coz who goes grocery shopping just to buy a bagful of carrots... hmmm... actually, I DO know someone who once bought 10 kilos of carrots but that's another blog!
Two carrots outside the bag adds to the realism.
Don't forget bag handles!
Here's Pita's buddy, Binboy...

Don't you agree they look good enough NOT to eat!


Purple pitbull how-to

I decided to add pitbulls to my puppies range. This is my tribute to Lennox, the pitbull that was euthanised just coz he was a pitbull and that's what BSL (breed specific legislation) does. The way I see it, it's genocide of a canine kind, it's discrimination, and it's senseless. Dog lovers know that it's not the breed, it's the owners. While we've never owned a pitbull, we have a rottweiler and 2 bullmastiffs, two breeds that are also often misunderstood. Today I'll show you how you can make your own pitbull to protest against BSL.
1) Start with a sausage. BTW, my pitbull puppy is purple but that's not intentional. I mixed white with black fondant hoping to get a dark charcoal grey but it turned out purple. Haha.
 2) Make indents on each end of the sausage.
 3) Make 2 slits on each end. I'm also showing a shortcut by making 2 paws from one piece of fondant.  If this doesn't work for you, follow my earlier blog on how to make each paw separately.
 4) Narrow the middle of the paws piece by rolling it between your thumb and forefinger.
 5) Bend and shape to make arms, like this.
 6) I place the arms on upturned silicon truffle moulds and stick a small bit of dried spaghetti to support the head.
 7) Time to make the head. Roll a teardrop shape.
 8) Stick a thin strip of white fondant.
 9) Form a white fondant sausage and attach to the face like this.
10) Attach the head to the arms.
 11) For the ears, make 2 small teardrop shapes, then flatten them like this.
 12) Stick to the head...

 13) ... pinch and bend to shape floppy ears.
 14) Add the nose.
 15) Add the eyes and you have one purple pitbull.
 16) Don't stop at one, make a few more.
17) And now that you've made a few, why stop? Just keep going. There's nothing scary about these pitbulls. :-)

Friday, July 20, 2012

Island monkeys

I made this island of monkeys yesterday and this time I remembered to take photos so I'm able to share some instructions today. :-)
1) Knead some blue gel colour into white fondant but do not mix the colour thoroughly so you'll get a marbled effect to look like sea waves. Use a fondant roller cutter to cut out a flat disc about 5" in diameter. You can use a circle cardboard template or just use a large bowl as a guide.
 2) Take one LCM breakfast bar (the Australian equivalent to Rice Krispies Treat).
 3) Shape the LCM into an irregular shape and cover with green fondant.
 4) Roll out some more green fondant and cut a random shape.
 5) Stick the random piece on the first 5" disc using water or sugar flower glue.
 6) Attach the LCM shape like this.
 7) Shape LCM into tree trunks and attach a piece of thin spaghetti to the bottom of the trunks.
 8) Cover the trunks with brown fondant and attach to the island like this.
 9) Add some leaves on the trunks.
 10) Add monkeys (I'll make a monkey tutorial in future, I promise!), or any other creatures - puppies, teddies, sunbathers, crocodiles, birds.... etc. I'm thinking a bunch of people marooned on a deserted island would be fun!
 11) Add details - more leaves on the trees and bananas.


 12) To make coconuts, roll balls of brown fondant and using a ball tool make an indent, then stick some white fondant in the indent and shape the insides with the ball tool.
 13) Finishing touches...
 14) Now all that remains is to bake the cake, ice it with buttercream and place this on top of the cake right before serving (surrounded by birthday candles of course - trick candles will add to the fun...hahahaha).

Bloggers.com

Bloggers - Meet Millions of Bloggers